
以下根据实际的开发样例来展示如何在已有的HarmonyOS工程中添加一个智能穿戴模块。
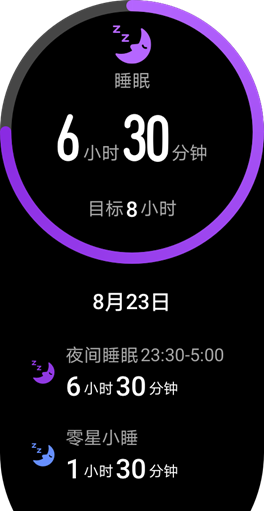
如图所示,这是一个睡眠检测应用,应用分为主界面和详情界面,可以选择使用PageSlider实现界面间的切换。PageSlider是一个布局管理器,用于实现左右滑动以及上下滑动的翻页效果。
在工程中添加一个模块,设备类型设置为“Wearable”,具体参考在工程中添加Module。
在左侧的Project窗口,打开,右键点击“layout”文件夹,选择,新建两个UI布局文件,分别命名为“layout_sleep.xml”和“layout_detail.xml”。
主界面的UI布局文件是“layout_sleep.xml”,其完整示例代码如下:
<DirectionalLayout xmlns:ohos=“http://schemas.huawei.com/res/ohos”
ohos:width=“match_parent”
ohos:height=“match_parent”
ohos:background_element=“#FF000000”
ohos:orientation=“vertical”>
<Image
ohos:id=“$+id:sleep_moon_img”
ohos:width=“46vp”
ohos:height=“46vp”
ohos:top_margin=“11vp”
ohos:layout_alignment=“horizontal_center”/>
<Text
ohos:width=“match_parent”
ohos:height=“19.5vp”
ohos:alpha=“0.66”
ohos:layout_alignment=“horizontal_center”
ohos:text_alignment=“center”
ohos:text=“$string:sleep”
ohos:text_color=“$color:sleep_text_white”
ohos:text_size=“16vp”/>
<DirectionalLayout xmlns:ohos=“http://schemas.huawei.com/res/ohos”
ohos:width=“match_content”
ohos:height=“65vp”
ohos:top_margin=“8vp”
ohos:layout_alignment=“horizontal_center”
ohos:orientation=“horizontal”>
<Text
ohos:id=“$+id:sleep_hour_text”
ohos:width=“match_content”
ohos:height=“match_content”
ohos:layout_alignment=“center”
ohos:text_alignment=“center”
ohos:text=“$string:dash”
ohos:text_color=“$color:sleep_text_white”
ohos:text_size=“58vp”
/>
<Text
ohos:width=“match_content”
ohos:height=“match_content”
ohos:left_margin=“2vp”
ohos:alpha=“0.66”
ohos:layout_alignment=“bottom”
ohos:bottom_padding=“9.5vp”
ohos:text=“$string:hour”
ohos:text_color=“$color:sleep_text_white”
ohos:text_size=“16vp”
/>
<Text
ohos:id=“$+id:sleep_min_text”
ohos:width=“match_content”
ohos:height=“match_content”
ohos:left_margin=“2vp”
ohos:layout_alignment=“center”
ohos:text_alignment=“center”
ohos:text=“$string:double_dash”
ohos:text_color=“$color:sleep_text_white”
ohos:text_size=“58vp”
/>
<Text
ohos:width=“match_content”
ohos:height=“match_content”
ohos:left_margin=“2vp”
ohos:alpha=“0.66”
ohos:layout_alignment=“bottom”
ohos:bottom_padding=“9.5vp”
ohos:text=“$string:minute”
ohos:text_color=“$color:sleep_text_white”
ohos:text_size=“16vp”
/>
</DirectionalLayout>
<DirectionalLayout xmlns:ohos=“http://schemas.huawei.com/res/ohos”
ohos:width=“match_content”
ohos:height=“25vp”
ohos:top_margin=“20.5vp”
ohos:layout_alignment=“horizontal_center”
ohos:orientation=“horizontal”>
<Text
ohos:width=“match_content”
ohos:height=“19.5vp”
ohos:text=“$string:goal”
ohos:alpha=“0.66”
ohos:text_alignment=“bottom”
ohos:bottom_margin=“1vp”
ohos:text_color=“$color:sleep_text_white”
ohos:text_size=“16vp”
/>
<Text
ohos:id=“$+id:sleep_goal_text”
ohos:width=“match_content”
ohos:height=“match_parent”
ohos:left_margin=“2vp”
ohos:text=“$string:target_sleep_time”
ohos:text_weight=“600”
ohos:text_color=“$color:sleep_text_white”
ohos:bottom_padding=“2vp”
ohos:text_size=“21vp”
/>
<Text
ohos:width=“match_content”
ohos:height=“19.5vp”
ohos:left_margin=“2vp”
ohos:alpha=“0.66”
ohos:text=“$string:hour”
ohos:text_color=“$color:sleep_text_white”
ohos:text_size=“16vp”
/>
</DirectionalLayout>
</DirectionalLayout>
详情界面的UI布局文件是“layout_detail.xml”,其完整示例代码如下:
<DirectionalLayout xmlns:ohos=“http://schemas.huawei.com/res/ohos”
ohos:width=“match_parent”
ohos:height=“match_parent”
ohos:orientation=“vertical”
ohos:background_element=“#FF000000”>
<Text
ohos:id=“$+id:detail_nodata_date”
ohos:width=“match_content”
ohos:height=“23vp”
ohos:top_margin=“20vp”
ohos:layout_alignment=“horizontal_center”
ohos:text_alignment=“bottom”
ohos:text_color=“$color:sleep_text_white”
ohos:text_weight=“600”
ohos:text_size=“19vp”/>
<Image
ohos:id=“$+id:detail_nodata_img”
ohos:width=“46vp”
ohos:height=“46vp”
ohos:top_margin=“25vp”
ohos:layout_alignment=“horizontal_center”
ohos:scale_mode=“zoom_center”/>
<Text
ohos:width=“match_content”
ohos:height=“match_content”
ohos:alpha=“0.66”
ohos:top_margin=“12vp”
ohos:layout_alignment=“horizontal_center”
ohos:text_alignment=“center”
ohos:text=“$string:no_data”
ohos:text_color=“$color:sleep_text_white”
ohos:text_size=“16vp”/>
<Text
ohos:width=“match_content”
ohos:height=“match_content”
ohos:alpha=“0.66”
ohos:layout_alignment=“horizontal_center”
ohos:text_alignment=“center”
ohos:text=“$string:wearing_watch_tips”
ohos:text_color=“$color:sleep_text_white”
ohos:text_size=“16vp”/>
</DirectionalLayout>
在左侧项目文件栏中,选择,在对应的AbilitySlice文件的onStart里,使用代码创建PageSlider,添加这两个相应的界面。
public class SleepPageSlice extends AbilitySlice {
private static final String TAG = “SleepPageSlice”;
private static final HiLogLabel LABEL = new HiLogLabel(HiLog.LOG_APP, 0, TAG);
// 页面类型总数
private static final int PAGE_CAPACITY = 2;
private PageSlider mPageSlider;
private SleepViewContainer mSleepViewContainer;
private PageContainerSlideProvider mAdapter = new PageContainerSlideProvider(PAGE_CAPACITY);
public void onStart(Intent intent) {
super.onStart(intent);
HiLog.info(LABEL, “onStart”);
// 设置主界面
DirectionalLayout layout = new DirectionalLayout(this);
ComponentContainer.LayoutConfig config = new ComponentContainer.LayoutConfig(
ComponentContainer.LayoutConfig.MATCH_PARENT,
ComponentContainer.LayoutConfig.MATCH_PARENT);
layout.setLayoutConfig(config);
// 使用ViwePager做滑动效果
mPageSlider = new PageSlider(this);
ComponentContainer.LayoutConfig viewPagerParam = new ComponentContainer.LayoutConfig(
ComponentContainer.LayoutConfig.MATCH_PARENT,
ComponentContainer.LayoutConfig.MATCH_PARENT);
mPageSlider.setLayoutConfig(viewPagerParam);
mPageSlider.setOrientation(DirectionalLayout.VERTICAL);
layout.addComponent(mPageSlider);
setUIContent(layout);
// 添加子页面
mSleepViewContainer = new SleepViewContainer(this);
mAdapter.addPageContainer(mSleepViewContainer);
mAdapter.addPageContainer(new DetailViewContainer(this));
mPageSlider.setProvider(mAdapter);
}
}
以下是page数据提供器PageContainerSlideProvider的实现。
public class PageContainerSlideProvider extends PageSliderProvider {
private static final String TAG = “PageContainerSlideProvider”;
private static final HiLogLabel LABEL = new HiLogLabel(HiLog.LOG_APP, 0, TAG);
private final List<PageContainer> mList;
public PageContainerSlideProvider(int capacity) {
mList = new ArrayList<>(capacity);
}
public int getCount() {
return mList.size();
}
public Object createPageInContainer(ComponentContainer componentContainer, int index) {
HiLog.info(LABEL, “createPageInContainer index: %{public}d.”, index);
if (index >= mList.size() || (componentContainer == null)) {
HiLog.error(LABEL, “instantiateItem index error”);
return Optional.empty();
}
PageContainer item = mList.get(index);
item.getComponent().ifPresent(componentContainer::addComponent);
return item;
}
public void destroyPageFromContainer(ComponentContainer componentContainer, int index, Object obj) {
HiLog.info(LABEL, “destroyPageFromContainer index: %{public}d”, index);
if (componentContainer == null) {
HiLog.error(LABEL, “destroyPageFromContainer componentContainer is null”);
return;
}
if (!(obj instanceof PageContainer)) {
HiLog.error(LABEL, “destroyPageFromContainer obj error”);
return;
}
PageContainer item = (PageContainer) obj;
item.getComponent().ifPresent(componentContainer::removeComponent);
}
public boolean isPageMatchToObject(Component component, Object object) {
return component == object;
}
/**
* 增加分页
*
* @param pageContainer 分页
*/
public void addPageContainer(PageContainer pageContainer) {
HiLog.info(LABEL, “addPageContainer”);
pageContainer.onPageCreated();
mList.add(pageContainer);
}
// 清除所有页面
public void clearPageContainer() {
HiLog.info(LABEL, “clearPageContainer”);
for (PageContainer item : mList) {
item.onPageDestroy();
}
mList.clear();
notifyDataChanged();
}
/**
* 获取当前条目
*
* @param index page的index
* @return 当前的条目
*/
public Optional<PageContainer> getItemOfIndex(int index) {
if (index >= mList.size() || index < 0) {
HiLog.error(LABEL, “get item error, index: %{public}d”, index);
return Optional.empty();
}
return Optional.of(mList.get(index));
}
}
增加PageContainer容器接口和两个页面的实现方式,如下是容器的接口PageContainer.java。
public interface PageContainer {
/**
* 获取存放的component
*
* @return 存放的component
*/
default Optional<Component> getComponent() {
return Optional.empty();
}
// 页面加载的回调
default void onPageCreated() { }
// 页面销毁的回调
default void onPageDestroy() { }
// 页面被选中的回调
default void onPageSelected() { }
}
增加第一个页面SleepViewContainer 和第二个页面DetailViewContainer ,这两个页面从xml里加载。以下是首页SleepViewContainer 的实现。
public class SleepViewContainer implements PageContainer {
private static final String TAG = “SleepViewContainer”;
private static final HiLogLabel LABEL = new HiLogLabel(HiLog.LOG_APP, 0, TAG);
// 目标睡眠时长默认值,单位:分钟
private static final int DEFAULT_SLEEP_TARGET_TIME = 480;
private CircleProgressDrawTask mDrawTask;
private AbilityContext mContext;
private Component mView;
private Image mImageView;
private Text mHourText;
private Text mMinText;
private Text mSleepContentText;
private Text mSleepHourTextUnit;
private Text mSleepMinTextUnit;
private Text mGoalText;
public SleepViewContainer(AbilityContext context) {
HiLog.info(LABEL, “constructor enter”);
this.mContext = context;
}
public Optional<Component> getComponent() {
HiLog.info(LABEL, “getComponent enter”);
return Optional.ofNullable(mView);
}
public void onPageCreated() {
HiLog.info(LABEL, “onPageCreated enter”);
mView = LayoutBoost.inflate(LayoutScatter.getInstance(mContext), mContext,
ResourceTable.Layout_layout_sleep, null, false);
init();
}
public void onPageDestroy() {
HiLog.info(LABEL, “onPageDestroy enter”);
}
private void init() {
HiLog.info(LABEL, “init enter”);
ByTrace.startTrace(“SleepViewContainer.init”);
mDrawTask = new CircleProgressDrawTask(mView);
mDrawTask.setMaxValue(DEFAULT_SLEEP_TARGET_TIME);
mImageView = (Image) mView.findComponentById(ResourceTable.Id_sleep_moon_img);
mImageView.setPixelMap(ResourceTable.Media_sleep_001);
mHourText = (Text) mView.findComponentById(ResourceTable.Id_sleep_hour_text);
mMinText = (Text) mView.findComponentById(ResourceTable.Id_sleep_min_text);
mSleepContentText = (Text) mView.findComponentById(ResourceTable.Id_sleep_content);
mSleepHourTextUnit = (Text) mView.findComponentById(ResourceTable.Id_sleep_hour_text_unit);
mSleepMinTextUnit = (Text) mView.findComponentById(ResourceTable.Id_sleep_min_text_unit);
mGoalText = (Text) mView.findComponentById(ResourceTable.Id_goal);
}
}
public class DetailViewContainer implements PageContainer {
private static final String TAG = “DetailViewContainer”;
private static final HiLogLabel LABEL = new HiLogLabel(HiLog.LOG_APP, 0, TAG);
private AbilityContext mContext;
private ComponentContainer mRoot;
public DetailViewContainer(AbilityContext context) {
HiLog.info(LABEL, “constructor enter”);
this.mContext = context;
}
public Optional<Component> getComponent() {
HiLog.info(LABEL, “getComponent enter”);
return Optional.ofNullable(mRoot);
}
public void onPageCreated() {
HiLog.info(LABEL, “onPageCreated”);
mRoot = new DirectionalLayout(mContext);
ComponentContainer.LayoutConfig config = new ComponentContainer.LayoutConfig(
ComponentContainer.LayoutConfig.MATCH_PARENT,
ComponentContainer.LayoutConfig.MATCH_PARENT);
mRoot.setLayoutConfig(config);
}
public void onPageDestroy() {
HiLog.info(LABEL, “onPageDestroy”);
}
}
增加一个类型为Page的Ability,并在config.json里进行注册。需要在onStart里调用setSwipeToDismiss(true),来设置右滑退出。示例代码如下:
public class PageAbility extends Ability {
public void onStart(Intent intent) {
super.onStart(intent);
super.setMainRoute(SleepPageSlice.class.getName());
setSwipeToDismiss(true);
}
}
{
“app”: {
“bundleName”: “com.huawei.health.sleep”,
“vendor”: “huawei”,
“version”: {
“code”: 1,
“name”: “1.1.06.04”
},
“apiVersion”: {
“compatible”: 2,
“target”: 2,
“releaseType”: “Release”
}
},
“deviceConfig”: {
“default”: {}
},
“module”: {
“package”: “com.huawei.health.sleep”,
“entryTheme”: “$theme:hapTheme”,
“name”: “.SleepApplication”,
“distro”: {
“moduleType”: “entry”,
“deliveryWithInstall”: true,
“moduleName”: “entry”
},
“deviceType”: [
“default”,
“wearable”
],
“reqCapabilities”: [
“video_support”
],
“abilities”: [
{
“name”: “.PageAbility”,
“icon”: “$media:icon_app”,
“label”: “$string:app_name”,
“launchType”: “singleton”,
“orientation”: “portrait”,
“visible”: true,
“permissions”: [],
“skills”: [
{
“actions”: [
“action.system.home”
],
“entities”: [
“entity.system.home”
]
}
],
“type”: “page”,
“formEnabled”: false
}
]
}
}
在睡眠界面中,我们用到了圆环效果,这里我们看一下圆环效果是如何实现的,如何实现自定义Component的效果。调用方代码如下:
drawTask = new CircleProgressDrawTask(root);
Componet类提供了UI的基本组件,包括方法addDrawTask(Component.DrawTask task)。该方法可以给任意一个Componet添加一段自定义绘制的代码。自定义Component的实现方法如下:
创建一个自定义DrawTask,包含与该Componet相关的自定义属性和绘制的代码。
在构造方法里传入宿主Component,跟自定义的DrawTask绑定。
实现睡眠圆环效果的示例代码如下。
public class CircleProgressDrawTask implements Component.DrawTask {
// 用于配置圆环的粗细,具体参数可以在xml文件中配置
private static final String STROKE_WIDTH_KEY = “stroke_width”;
// 用于配置圆环的最大值,具体参数可以在xml文件中配置
private static final String MAX_PROGRESS_KEY = “max_progress”;
// 用于配置圆环的当前值,具体参数可以在xml文件中配置
private static final String CURRENT_PROGRESS_KEY = “current_progress”;
// 用于配置起始位置的颜色,具体参数可以在xml文件中配置
private static final String START_COLOR_KEY = “start_color”;
// 用于配置结束位置的颜色,具体参数可以在xml文件中配置
private static final String END_COLOR_KEY = “end_color”;
// 用于配置背景色,具体参数可以在xml文件中配置
private static final String BACKGROUND_COLOR_KEY = “background_color”;
// 用于配置起始位置的角度,具体参数可以在xml文件中配置
private static final String START_ANGLE = “start_angle”;
private static final float MAX_ARC = 360f;
private static final int DEFAULT_STROKE_WIDTH = 10;
private static final int DEFAULT_MAX_VALUE = 100;
private static final int DEFAULT_START_COLOR = 0xFFB566FF;
private static final int DEFAULT_END_COLOR = 0xFF8A2BE2;
private static final int DEFAULT_BACKGROUND_COLOR = 0xA8FFFFFF;
private static final int DEFAULT_START_ANGLE = –90;
private static final float DEFAULT_LINER_MAX = 100f;
private static final int HALF = 2;
// 圆环的宽度, 默认10个像素
private int myStrokeWidth = DEFAULT_STROKE_WIDTH;
// 最大的进度值, 默认是100
private int myMaxValue = DEFAULT_MAX_VALUE;
// 当前的进度值, 默认是0
private int myCurrentValue = 0;
// 起始位置的颜色, 默认浅紫色
private Color myStartColor = new Color(DEFAULT_START_COLOR);
// 结束位置的颜色, 默认深紫色
private Color myEndColor = new Color(DEFAULT_END_COLOR);
// 背景颜色, 默认浅灰色
private Color myBackgroundColor = new Color(DEFAULT_BACKGROUND_COLOR);
// 当前的进度值, 默认从-90度进行绘制
private int myStartAngle = DEFAULT_START_ANGLE;
private Component myComponent;
// 传入要进行修改的component
public CircleProgressDrawTask(Component component) {
myComponent = component;
myComponent.addDrawTask(this);
}
// 设置当前进度并且刷新component,value值为当前进度
public void setValue(int value) {
myCurrentValue = value;
myComponent.invalidate();
}
public void setMaxValue(int maxValue) {
myMaxValue = maxValue;
myComponent.invalidate();
}
public void onDraw(Component component, Canvas canvas) {
// 通过canvas实现绘制圆环的功能
……
}
}