RadioContainer是RadioButton的容器,在其包裹下的RadioButton保证只有一个被选项。
支持的XML属性
RadioContainer的共有XML属性继承自:DirectionalLayout
创建RadioContainer
在layout目录下的xml文件创建RadioContainer,并在RadioContainer中创建RadioButton。
<RadioContainer
    ohos:id="$+id:radio_container"
    ohos:height="match_content"
    ohos:width="match_content"
    ohos:top_margin="32vp"
    ohos:layout_alignment="horizontal_center">
    <RadioButton
        ohos:id="$+id:radio_button_1"
        ohos:height="40vp"
        ohos:width="match_content"
        ohos:text="A.Learning"
        ohos:text_size="14fp"/>
    <!-- 放置多个RadioButton -->
    ...
</RadioContainer>
图1 RadioContainer效果

设置RadioContainer
- 设置响应RadioContainer状态改变的事件。
RadioContainer container = (RadioContainer) findComponentById(ResourceTable.Id_radio_container);
container.setMarkChangedListener(new RadioContainer.CheckedStateChangedListener() {
    @Override
    public void onCheckedChanged(RadioContainer radioContainer, int index) {
    // 可参考下方场景实例代码,自行实现
    ...
    }
});
根据索引值设置指定RadioButton为选定状态。
container.mark(0);清除RadioContainer中所有RadioButton的选定状态。
container.cancelMarks();
设置RadioButton的布局方向:orientation设置为“horizontal”,表示横向布局;orientation设置为“vertical”,表示纵向布局。默认为纵向布局。
在xml中设置:
<RadioContainer
    ...
    ohos:orientation="horizontal">
    ...
</RadioContainer>
在Java代码中设置:
container.setOrientation(Component.HORIZONTAL);图2 设置布局方向为横向布局效果

场景实例
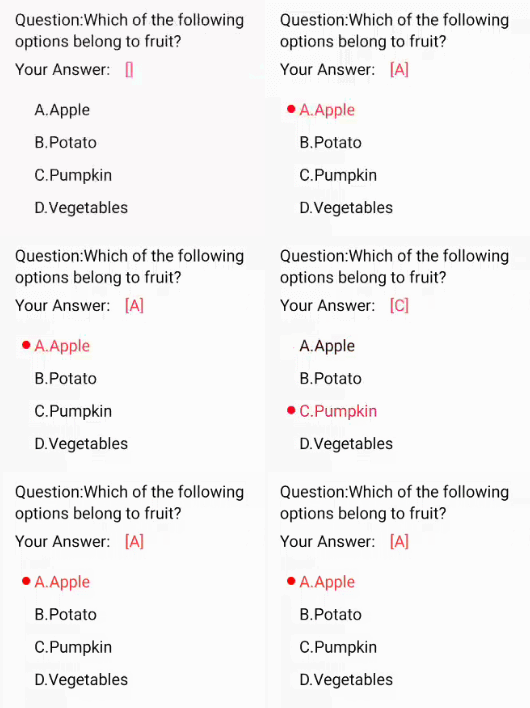
使用RadioContainer实现单选题的选择效果。
图3 实现单选场景效果

xml代码示例:
<?xml version="1.0" encoding="utf-8"?>
<DirectionalLayout
    xmlns:ohos="http://schemas.huawei.com/res/ohos"
    ohos:height="match_parent"
    ohos:width="match_parent"
    ohos:alignment="horizontal_center"
    ohos:orientation="vertical"
    ohos:left_padding="32vp">
    <Text
        ohos:height="match_content"
        ohos:width="300vp"
        ohos:top_margin="32vp"
        ohos:text="Question:Which of the following options belong to fruit?"
        ohos:text_size="20fp"
        ohos:layout_alignment="left"
        ohos:multiple_lines="true"/>
    <DirectionalLayout
        ohos:height="match_content"
        ohos:width="match_parent"
        ohos:orientation="horizontal"
        ohos:top_margin="8vp">
        <Text
            ohos:height="match_content"
            ohos:width="match_content"
            ohos:text="Your Answer:"
            ohos:text_size="20fp"/>
        <Text
            ohos:id="$+id:text_checked"
            ohos:height="match_content"
            ohos:width="match_content"
            ohos:text_size="20fp"
            ohos:left_margin="18vp"
            ohos:text="[]"
            ohos:text_color="#FF3333"/>
    </DirectionalLayout>
    <RadioContainer
        ohos:id="$+id:radio_container"
        ohos:height="match_content"
        ohos:width="200vp"
        ohos:layout_alignment="left"
        ohos:orientation="vertical"
        ohos:top_margin="16vp"
        ohos:left_margin="4vp">
        <RadioButton
            ohos:id="$+id:radio_button_1"
            ohos:height="40vp"
            ohos:width="match_content"
            ohos:text="A.Apple"
            ohos:text_size="20fp"
            ohos:text_color_on="#FF3333"/>
        <RadioButton
            ohos:id="$+id:radio_button_2"
            ohos:height="40vp"
            ohos:width="match_content"
            ohos:text="B.Potato"
            ohos:text_size="20fp"
            ohos:text_color_on="#FF3333"/>
        <RadioButton
            ohos:id="$+id:radio_button_3"
            ohos:height="40vp"
            ohos:width="match_content"
            ohos:text="C.Pumpkin"
            ohos:text_size="20fp"
            ohos:text_color_on="#FF3333"/>
        <RadioButton
            ohos:id="$+id:radio_button_4"
            ohos:height="40vp"
            ohos:width="match_content"
            ohos:text="D.Vegetables"
            ohos:text_size="20fp"
            ohos:text_color_on="#FF3333"/>
    </RadioContainer>
</DirectionalLayout>
Java代码示例:通过以下方法,定义RadioButton的背景。
    private StateElement createStateElement() {
        ShapeElement elementButtonOn = new ShapeElement();
        elementButtonOn.setRgbColor(RgbPalette.RED);
        elementButtonOn.setShape(ShapeElement.OVAL);

        ShapeElement elementButtonOff = new ShapeElement();
        elementButtonOff.setRgbColor(RgbPalette.WHITE);
        elementButtonOff.setShape(ShapeElement.OVAL);

        StateElement checkElement = new StateElement();
        checkElement.addState(new int[]{ComponentState.COMPONENT_STATE_CHECKED}, elementButtonOn);
        checkElement.addState(new int[]{ComponentState.COMPONENT_STATE_EMPTY}, elementButtonOff);
        return checkElement;
    }
设置RadioButton的背景。
RadioContainer radioContainer = (RadioContainer) findComponentById(ResourceTable.Id_radio_container);
int count = radioContainer.getChildCount();
for (int i = 0; i < count; i++){
    ((RadioButton) radioContainer.getComponentAt(i)).setButtonElement(createStateElement());
}
设置响应RadioContainer状态改变的事件,显示单选结果。
Text answer = (Text) findComponentById(ResourceTable.Id_text_checked);
radioContainer.setMarkChangedListener((radioContainer1, index) -> {
    answer.setText(String.format("[%c]",(char)('A'+index)));
});